mkRelay – A simple wss Relay Server for Godot
This time, it’s “something with Godot“. When I saw that more teams at a local game jam were using Godot than Unity, I knew it was time. I’m late to the party anyway.
The game engine and editor are very mature, easy to use, with lots of documentation. Also, GDScript (which I’m using here, as Web exports don’t work with C# currently) feels much more comfortable than I’d have thought (might be due to the static typing options 😜).
I really recommend to give Godot a try. It has grown and seems to be a very good alternative to Unity by now (well, maybe not for high-end games, but that is out of my scope anyway). It’s free and open source – and you can join the discussion about how to pronounce the name correctly…
As my first test project, I’ve created a simple “relay server” (named mkRelay) that I (and others, maybe) could use for smaller online game prototypes. Added an example application, too.
The work on this did not cover a lot of Godot’s gfx capabilities, but it gave me a good “first feeling” how to use the engine.
What is a (game) Relay Server?
You might know the “Unity Relay Servers” – or other such services. My little implementation is a very small subset of what these offer. But I can set up and run it all by myself.
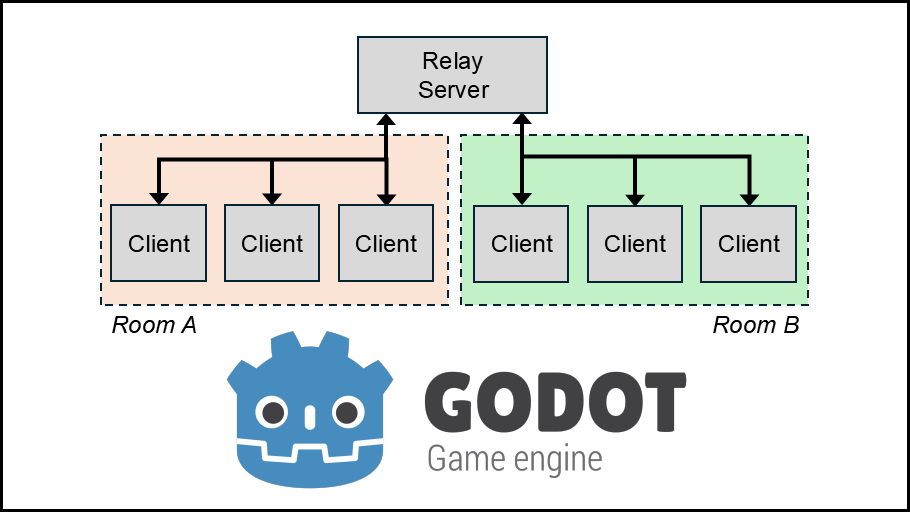
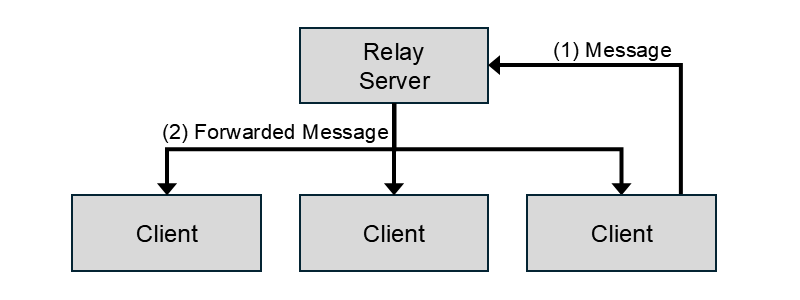
Basically, (game)clients connect to a server which does nothing but forward messages from one client to all connected clients. So, the server is not “running the game” (nor knowing anything about it), it simply distributes data to all clients – and these need to handle everything else (what data to send – how to interpret it, etc).
In addition, the server could offer additional “goodies”, like providing different “rooms” (where only clients in one “room” can send messages to each other), or special messages when clients enter/leave the room etc.

What mkRelay should be and do
- A headless Relay Server should run on a dedicated (small/cheap) linux VM
- The Relay Server should be created with Godot/GDScript
- The server should provide “rooms”, so that different groups of clients (ie, different apps/games) can communicate independently, without adapting the server
- A client should be provided, to be included into my Godot projects and handle server communication
- As the server only relays, there should be helper structures to handle custom app/game messages in the clients
- The data transfer did not need to be fast-paced (ie 1st Person Shooter Game ready), as one would select more professional solutions in this case anyway. Target apps are things like chat systems, point&click, and so on
- The client should be able to run as standalone app (Windows, in my case) and in Browsers* as well
*Note that this required the include of SSL/TLS and certificates on server side – it made things a bit more complicated than just connecting stand-alone clients. Afaik, modern browsers would not allow to connect a web game with websockets [to another port] out-of-the box (but that I wanted)
About the Implementation
As it should run with web and standalone clients, websockets were a good choice for the protocol. Also, Godot already offers a lot of functionality with its low-/mid-level networking there. So, why not use that?
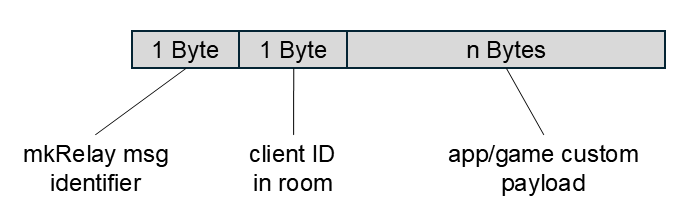
As for the mkRelay protocol (on top of Godot websocket networking), it is a slim envelope that contains custom app/game data bytes and/or administration data for the relay server.
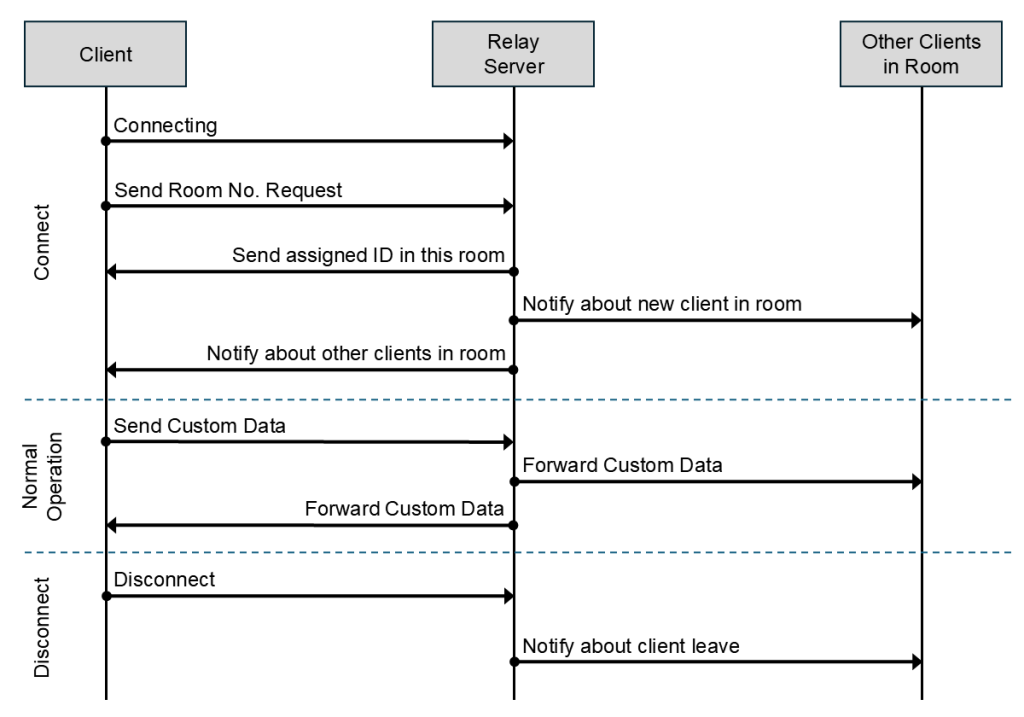
First, the client needs to open a connection to the server. Then it sends a “room request” (which is a uuid string). After being granted acccess to that room, the server sends back the unique ID of this client in the room, and also informs all other clients in the room about the new one. Likewise, when a client leaves a room, all others in the room are informed by the server.
Then, during regular operation (a client is in a room), a custom bunch of bytes (the “client custom message to other clients”) would be sent to the server, given a short check there, and be distributed to all clients (again, of the room).
A client can not send to others before being granted “entry” to a room and having a unique ID in that room.
With that, the basic “relay function” is already done. But how to create and interpret the “custom data bytes” that are being sent from one client to all others (in the room)?
You could totally roll your own implementation – or use the client template that is also included with mkRelay. In there, you can see how to handle callbacks from the network client, encode/send and receive/decode data and more (see below for more details). Packaging of data in the template is done by a “variant_type-to-bytes” approach, which is not the most effective way (in terms of message byte length). But we are not in fast-paced 1st-Person-Shooter world here, anyway. 😁
Live Demo
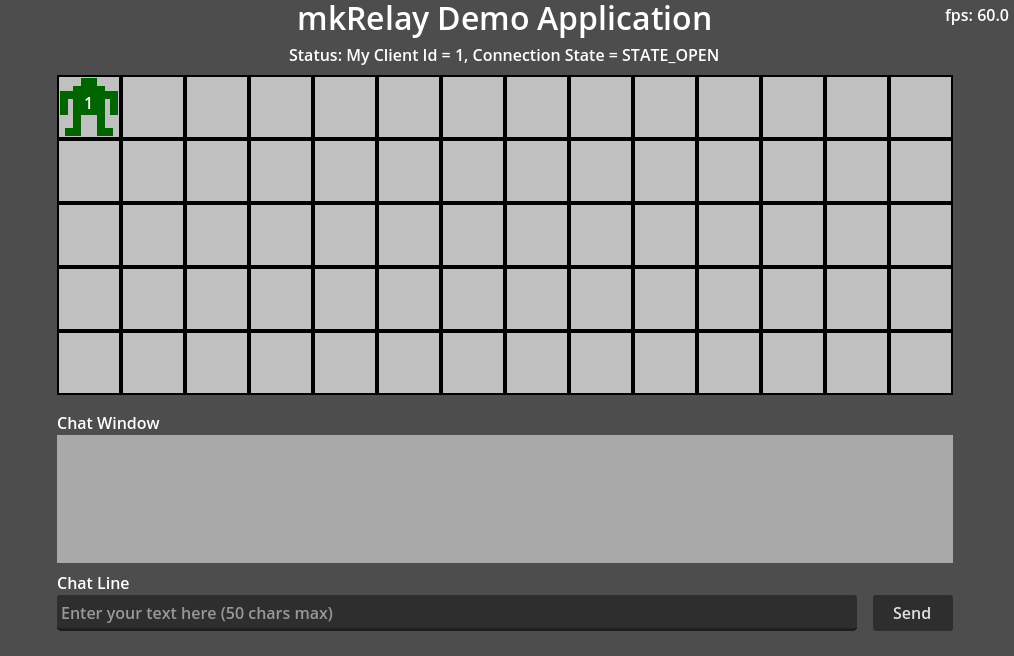
Before going into more detail on how to roll your own server and client, you might want to check out the “live demo” client: A Godot web application, connecting to my little test relay server. You can post chat messages and move an icon around by clicking. You might want to use several browser instances for your own little multiplayer game experience.
The Godot web export (“the game”) will be downloaded via https on port 443, while the game is then connecting to the server on port 9080 via wss://mkrelay.mikoweb.eu
Link: https://mkrelay.mikoweb.eu/mkRelayDemoClient.exe.html
If you want to test connectivity with a Windows desktop version of this client, you could download that here
mkRelayDemoClient_WindowsExe.zip, 32MB, 31.10.2025
Source Downloads (MIT-License, Godot 4.5.1)
mkRelay_DevProject.zip, 22 KB, 31.10.2025
The project I used for development. Contains both, client and server code. It starts one server and several clients locally and uses a few handshake and communication calls for testing. This is only intended to run locally in the Godot editor.

mkRelayDemoClient.zip. 22 KB, 31.10.2025
The demo client code for the “live demo”, as it has been provided for download on my test server. It should work as-is and connect to my demo server
mkRelayDemoServer.zip, 13 KB, 31.10.2025
The demo server code for the “live demo”, as it has been deployed to my test server. For your own deployment, you would at least need to adapt the paths to the TLS certificate/key (see below for details)
mkRelay Folders & Files
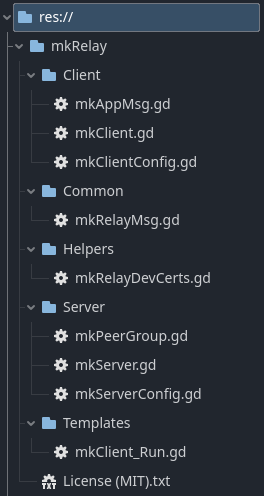
For your own apps, just add the mkRelay folder from the dev project above.
When creating a server, the ./Client directory could be deleted (likewise, the ./Server folder is obsolete when going for a client).
In ./Helpers, there is a script for creating local self-signed ssl certificates. And ./Templates holds an example of a basic client app with some made-up custom data
How to set up your own Relay SERVER
- Create a new Godot project, add the /mkRelay folder from the mkRelay_DevProject, delete the /Client and /Templates subfolder. Add a node to the project and assign /mkRelay/Server/mkServer.gd.
- If you want to run locally first, create local self-signed TLS certifcates by running /mkRelay/Helpers/mkRelayDevCerts.gd once (assign to a node, start).
- Check /mkRelay/Server/mkServerConfig.gd for configuration (server port, path-to-your-certificates-on-server, etc).
- Export as dedicated server.
- For my little demo, I’ve rented the smallest Debian VM from IONOS (1 EUR/Month, yeah), installed Caddy as webserver (easy TLS certificates retrieval!) and pointed a subdomain DNS entry to the server. A dedicated user (member of group www-data) hosts the Godot server in /home/username (installed as a service), while Caddy serves the client from /srv.
- The server exposes 3 ports, related to mkRelay: 80 (http, Caddy redirect to https), 443 (https for client page), 9080 (mkRelay server, to be connected by the client)
- Once set up and running, the server should not need to be touched again. It should be ready for different clients and groups – I hope, at least
How to set up your own Relay CLIENT
- Create a new Godot project, add the /mkRelay folder from the mkRelay_DevProject, delete the /Server subfolder. Add a node to the project and assign /mkRelay/Client/mkClient.gd.
- If you want to run locally first, create local self-signed TLS certifcates by running /mkRelay/Helpers/mkRelayDevCerts.gd once (assign to a node, start).
Note that the client does not need remote server certificates to be included. - Check /mkRelay/Client/mkClientConfig.gd for configuration (server url/port, room number to request, etc).
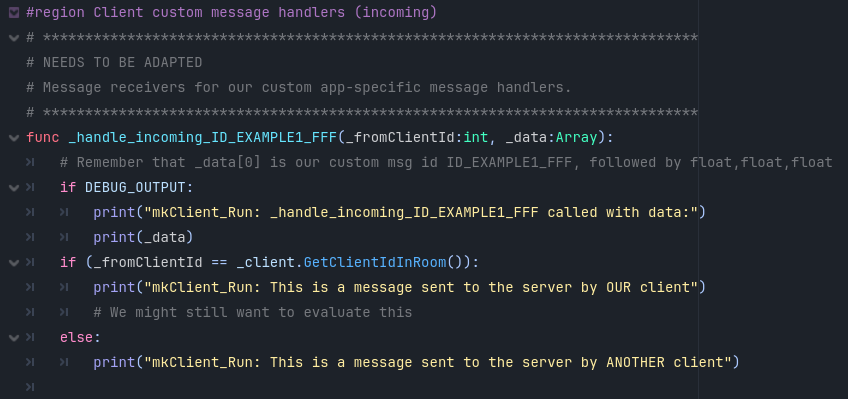
- You can then copy /mkRelay/Templates/mkClient_Run.gd or use and assign it directly to a node. In there, you’ll see the callback handlers for mkRelay messages – but still need to configure your custom app messages. In the file, you can see how I did it – you might go a different route and e.g. always convert your data to json and send as string.
Final Remarks
For the server, I’ve experimented with own Godot source-builds, to reduce the exe size. This actually worked (and was easy, see the docs here). Finally, I found it to not be worth the additional efforts. So, I’m using the vanilla Godot runtime version that comes included.
As mkRelay does only relay messages, there is no main (and persistent) game server, right? Well, I could think of writing clients “for a room” and one “special client” as server in this very room. The special client could always be connected and e.g. run on the server aswell. It would take some efforts in setting up the custom messages for this special case – and probably cause a lot of overhead data transfer (as mkRelay always sends to ALL clients; there is no “send to one dedicated client (in the room)”.
Anyway, I hope you can make use of one or the other bit presented here. For me, it was another great learning experience.
