2D with Depth – again
This is my 2nd take on “Rendering 2D-Images with Depth in Unity“. Although the first concept did work to some extent (see it here), I found it to be a tad complicated. Especially, when camera movement and larger maps are on the list. So, here is a somewhat different approach.
General Principle
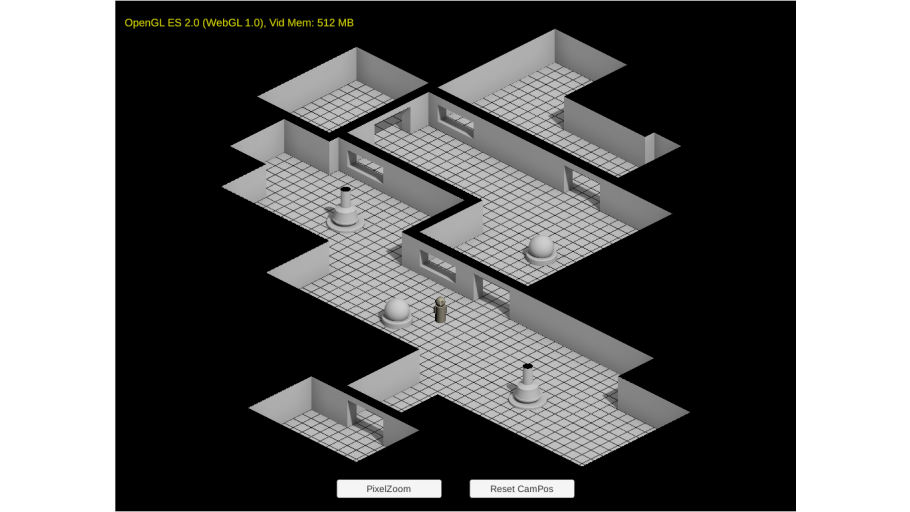
The general idea is to have a game scene where moving objects are “real 3D” objects, while the static background looks like 3D but in fact is not. It is a (single) picture that was rendered from the geometry beforehand, during production time. It was then exported, along with some depth information (usually, the distance from view point). All this would allow to use large and complicated 3D scenes as environment – without the need to render them during run-time in the game engine. This concept seems to be used quite often in isometric games with a 2.5D layout.
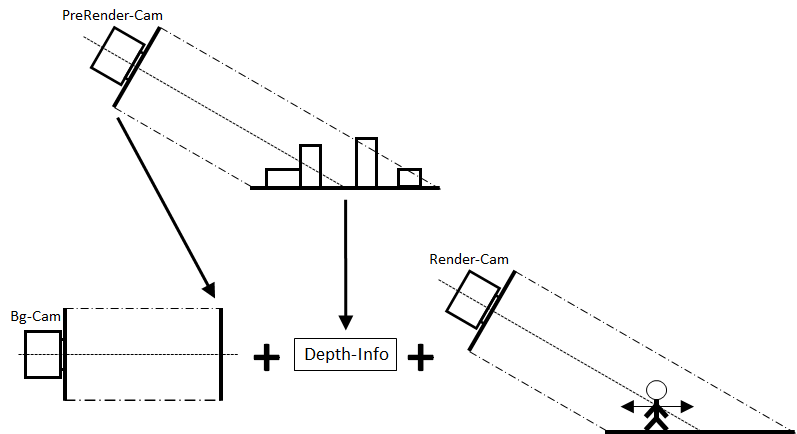
Picture: General setup, as often used. In the game scene, a background cam would render the pre-rendered environment picture, then draw real 3D objects on top. The “Depth-Info“ is used to decide which pixels of the 3D objects need to be skipped (as they are “hidden” by fake environment geometry)
Targets
These were my targets for the new approach:
- Modelling should happen in C4D (as before), the resulting *.fbx then imported into Unity.
- Pre-rendering and creation of depth info should be done in Unity now (not C4D, as before), to avoid problems due to different coordinate systems et al.
- Transfer of depth info from prerender to game scene should be easy, of small size and avoid bridge/conversion tools.
- Want a game cam that can move and zoom!
- Should only have one game cam (not one for background, one for 3D) – to avoid sync issues when moving/zooming.
- Should be able to be extended to large environments.
The Solution Now
In the project, there are two scenes: A Texture Scene (only used during production time for pre-rendering), and a Render Scene (representing the final “game”).
All cameras are set to (and used only in) orthographic mode. A camera angle (“looking down angle”) of 30deg has been chosen to have a simple perspective projection of 1:2 in z-direction (i.e., a “real” distance of 2 in z-direction will appear as distance 1 onscreen, which is 2 * sin(30deg). Accordingly, a plane of XZ-size 1×2 will look quadratic on the screen, due to perspective).
The environment 3D models are imported into the Texture Scene, where two textures are created: Background picture and background depth info. Those are then (statically) used in the Render Scene, where only one camera captures the background-picture-on-a-plane and also additional 3D objects. It also applies cut-outs, according to depth info.
Texture Scene
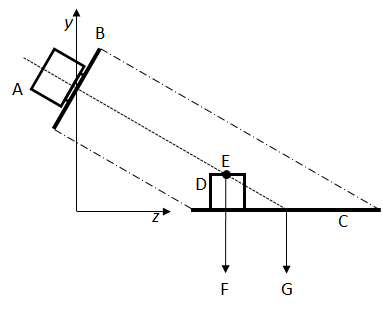
The size of the geometry to be rendered has been set to a XZ-plane of size 20×40 (C). Two cams (A) are positioned and scaled so that the plane exactly fills the complete (quadratic) screen (B).
As each screen pixel represents both, a position on the UV map of the plane, and also a position in world space, we do now have a “fixed” relation between these values. And we will use this in the render scene.
One important thing to note is that when rendering a point (E) of an object (D) in the scene, the pixel position on screen (B) – or a render texture – actually represents position (G), while the pixel’s world position (e.g. reported by a shader) is position (F).
The colored background is rendered using regular Unity shaders. Here, quality (and resources) of GI and shadow calculations can be maxed out, as only the produced render texture will be used afterwards.
Depth information is retrieved by a custom shader and stored as RGBA-coded float texture. As depth information, the (downscaled) ZY-distance from point E to a fixed point in world space is used.
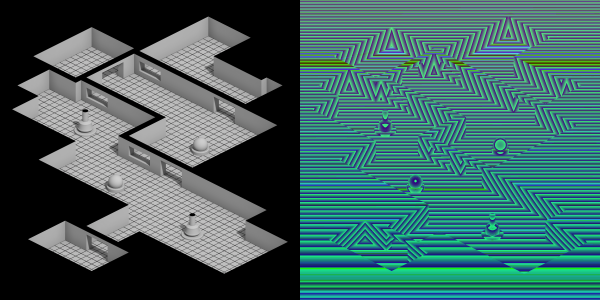
Finally, the two textures, created by the Texture Scene are passed on to the Render Scene (using 4094×4096 textures):
Texture Scene Depth Shader
Shader "Custom/DepthShader"
{
 Properties
 {
 }

 SubShader
 {
  Tags { "RenderType" = "Opaque" }

  Pass
  {
   CGPROGRAM

   #pragma vertex vert
   #pragma fragment frag
   #pragma target 3.0
   #pragma only_renderers d3d11

   #include "UnityCG.cginc"

   static const float3 FIXED_CAM_POS = float3(0, 11.54701, 0);
   static const float SCALEFACTOR = 100;

   struct appdata
   {
    float4 vertex : POSITION;
   };

   struct v2f
   {
    float4 vertex: SV_POSITION;
    float3 worldPos: TEXCOORD0;
   };

   v2f vert(appdata v)
   {
    v2f o;
    o.vertex = UnityObjectToClipPos(v.vertex);
    o.worldPos = mul(unity_ObjectToWorld, v.vertex).xyz;
    return o;
   }

   float4 frag(v2f i) : SV_Target
   {
    // Distance from current (fixed) cam pos to pixel world pos
    float3 vDist = i.worldPos - FIXED_CAM_POS;

    // Only considering distance in YZ-plane and scaling
    float Dist = length(float3(0, vDist.y, vDist.z)) / SCALEFACTOR;

    return(EncodeFloatRGBA(Dist));
   }

   ENDCG
  }
 }
}
Render Scene
Here, the background texture is applied to a plane of same size as in the Texture Scene and is drawn by regular Unity shaders (obviously, no lighting/shadows needed, as it is all baked into the texture already).
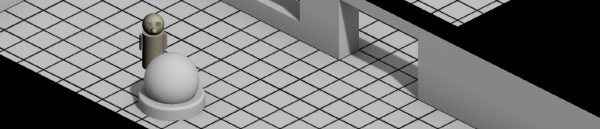
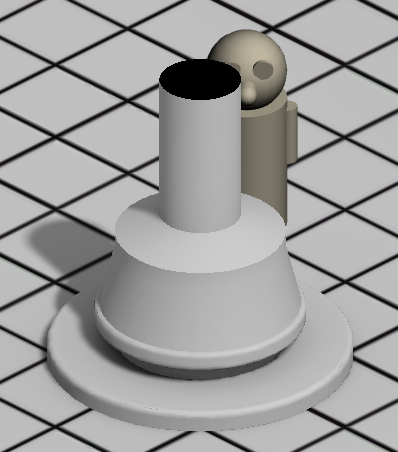
Additional 3D geometry in the scene (e.g. an avatar) is rendered by a custom shader. It samples the depth texture and decides about cutouts (i.e. pixels of the 3D geometry that are not drawn, as they would be hidden bei environment geometry).
The sampling of the depth texture is based on the (corrected) world position of a pixel, as reported by the shader. This value is compared to the distance of the render pixel’s world position to a fixed reference position in world space (the same reference as when the depth map was stored). If pre-rendered value is smaller, the environment geometry is nearer to the viewer – and this part of the 3D object will not be drawn.
Finally, very basic lighting is applied to the 3D geometry.
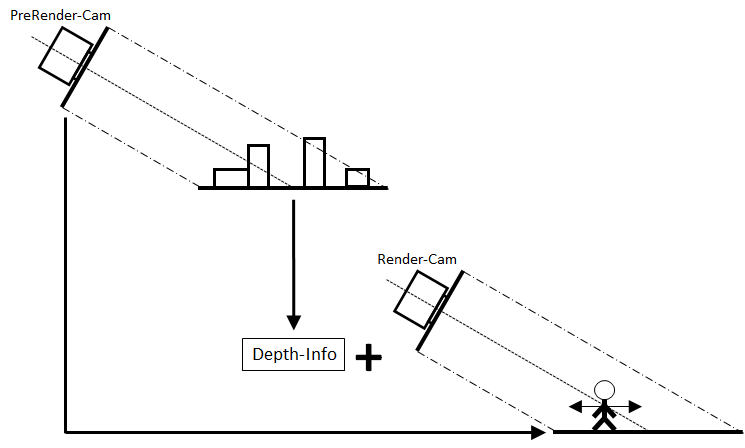
Only one camera is involved, and sampling is based on world positions. Also, the pre-rendered background is fixed on a plane in world space. The camera can now easily be moved and zoomed. Also, different screen resolutions do not cause trouble.
Render Scene Shader
Shader "Custom/SceneShader"
{
 Properties
 {
  _MainTex("MainTexture", 2D)	  = "white" {}
  _DepthTex("DepthTexture", 2D) = "white" {}
 }

 SubShader
 {
  Tags { "RenderType" = "Opaque" }
  Tags {"LightMode" = "ForwardBase"}

  Pass
  {
   CGPROGRAM
   #pragma vertex vert
   #pragma fragment frag
   #pragma target 3.0
   #pragma only_renderers d3d11

   #include "UnityCG.cginc"
   #include "UnityLightingCommon.cginc"

   static const float3 FIXED_CAM_POS = float3(0, 11.54701, 0);
   static const float SCALEFACTOR = 100;
   static const float TAN30DEG = 0.57735026918962576450914878050196;
   static const float WORLDPOS_X_OFFS = 10;
   static const float WORLDPOS_Y_OFFS =  0;
   static const float WORLDPOS_X_SIZE = 20;
   static const float WORLDPOS_Y_SIZE = 40;

   struct appdata
   {
    float4 vertex : POSITION;
    float3 normal : NORMAL;
    float2 uv : TEXCOORD0;
    fixed3 color : COLOR0;
   };

   struct v2f
   {
    float4 vertex : SV_POSITION;
    float2 uv : TEXCOORD0;
    float3 worldPos : TEXCOORD1;
    float4 diffuse : COLOR0;
   };

   sampler2D _MainTex;
   float4 _MainTex_ST;

   sampler2D_float _DepthTex;
   float4 _DepthTex_ST;

  v2f vert(appdata v)
  {
   v2f o;
   o.vertex = UnityObjectToClipPos(v.vertex);
   o.uv = TRANSFORM_TEX(v.uv, _MainTex);
   o.worldPos = mul(unity_ObjectToWorld, v.vertex).xyz;

   // Simple lighting
   half3 worldNormal = UnityObjectToWorldNormal(v.normal);
   half nl = max(0, dot(worldNormal, _WorldSpaceLightPos0.xyz));
   o.diffuse = nl * _LightColor0;

   return o;
  }

  float4 frag(v2f i) : SV_Target
  {
   i.uv = float2(1,1) - i.uv;
   float4 colObj = tex2D(_MainTex, i.uv) * i.diffuse;

   float2 DepthUV = (i.worldPos.xz + float2(WORLDPOS_X_OFFS, WORLDPOS_Y_OFFS));
   DepthUV /= float2(WORLDPOS_X_SIZE, WORLDPOS_Y_SIZE);
   DepthUV.y += (i.worldPos.y / TAN30DEG / WORLDPOS_Y_SIZE);

   float DistOld = DecodeFloatRGBA(tex2D(_DepthTex, DepthUV)) * SCALEFACTOR;

   float3 vDistNew = i.worldPos - FIXED_CAM_POS;
   float DistNew = length(float3(0, vDistNew.y, vDistNew.z));

   if (DistNew > DistOld) discard;
   return(colObj);
   }

   ENDCG
  }
 }
}
Outlook
A nifty (fake) dropshadow could certainly improve the presentation of avatars. This would need additions to the custom renderscene shader for drawing transparency (not done in this demo) .
The concept is shown for one prerender plane only. I believe that much larger environments could be done by using tiles and offsets and e.g. assigning texture arrays to the renderscene shader (not done in this demo).
Downloads
| File | Date | Size | Remarks |
| PreRenderDemo2.unitypackage.zip | 01/07/2019 | 46.5 MB | unity demo source (.unitypackage) |
| PreRenderDemo2.zip | 01/07/2019 | 28.5 MB | unity demo (.exe) with pathfinding |
| Link: Online WebGL Demo (Unity 2019.2) of the downloadable package | 05/23/2019 | – | Tested with Firefox 67, Google Chrome 74, Microsoft Edge 44. Not working with IE. |
